Showing posts with label rotary cutting. Show all posts

Tiered Pillowcase Dress Sew Along: Week 1 - Cutting


Welcome!  I am so excited to share this sew along with all of you! I really hope that you have as much fun with these little dresses as I have had.

This is the first sew along that I have hosted here at The Merry Church Mouse, so please feel free to comment as to what you like or dislike or what I can improve upon.  Let me know if a step is unclear and I will do my best to help you understand it.

In reading my book on time management, I have come to realize that knowing how long a task will take helps you to know where to place it within your time frame.  I will post a time frame for each week's activity so that you know generally how long to expect each step to take.

So without further ado... let's get started, shall we?

Step 1: Cutting (time required-about 1 hour)

At this point, your fabric should be pre-washed and ironed.  Iron it just as if it came off the bolt, with the fold down the middle, lining up your selveges. 

This dress is composed, primarily, of rectangular pieces of fabric.  I generally use a rotary cutter to cut these pieces.   If you are not familiar with using a rotary cutter, there is a great tutorial here.

The rectangles and sizes you will need are as follows:
Size 2-3
Bodice - 2 rectangles at 13x9 inches
Tier 1 - 2 rectangles at 20x8 inches
Tier 2 - 2 rectangles at 40x8 inches (increase to 8 1/2 inches if you will be turning under the edge for a hem instead of serging the edge)

Size 4-5
Bodice - 2 rectangles at 14x9 1/2 inches
Tier 1 - 2 rectangles at 20x8 1/2 inches
Tier 2 - 2 rectangles at 40x8 1/2 inches (increase to 9 inches if you will be turning under the edge for a hem instead of serging the edge)

Size 6-7
Bodice - 2 rectangles at 15x10 1/4 inches
Tier 1 - 2 rectangles at 30x9 1/4 inches
Tier 2 - 4 rectangles at 30x9 1/4 inches (increase to 9 3/4 inches if you will be turning under the edge for a hem instead of serging the edge)


Size 8-10
Bodice - 2 rectangles at 17x12 1/2 inches
Tier 1 - 2 rectangles at 34x11 1/2 inches
Tier 2 - 4 rectangles at 34x11 1/2 inches (increase to 12 inches if you will be turning under the edge for a hem instead of serging the edge)

For the bodice pieces, leaving the fabric folded and using the measurement for the short side of the rectangle, cut a strip of fabric.  

 With the fabric still folded, cut the selvages off square and then measure the length of the long side of the rectangle and cut that square as well.  Leave these two pieces layered together just as you cut them.  Set them aside for the moment.

For the tier pieces, do the same using the short side of the rectangle as the width of the strip.  Then  measure in from the fold half the length of the long side of the rectangle.

In the end you should wind up with 6 rectangles of fabric for sizes 2-3 and 4-5 and 8 rectangles for sizes 6-7 and 8-10.  

Set aside the tier pieces for now, we will come back to them in a couple of weeks.  

Download and print the armhole templates.  
Size 2-3 and 4-5 here, and size 6-7 and 8-10 here. 

I had an acrylic template made to use because I use this armhole shape quite often. That is what I am using for the pictures, but the paper template will work exactly the same way.  


Leaving them still layered together, take your rectangles for the bodice pieces and lay them in front of you so that the short ends are to your right and left side and the long edges are along the bottom and top.  Place the template flush with the top edge of the fabric, and the side edge flush with the side edge of the rectangle.


Trace a line with your Mark-B-Gone pen or tailors chalk (or soap sliver).

Flip the template over and do the same thing along the other side mirror imaging the first marking.  

Cut along the markings through both layers of fabric at once.
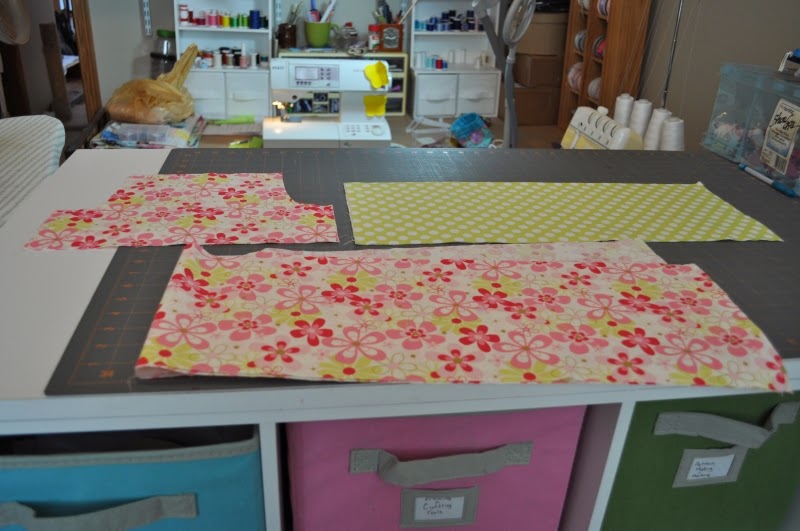
Your finished piece should look like this.  

And here are the finished pieces all laid out.  There are two of each of these.   Mine are for a size 2-3
That's it for this week!  

For next week's installment, we will assemble the bodice. 
Happy cutting!


12 Helpful Tips for Beginning Quilters


1.  Your fabric and batting choices matter.

When choosing fabric it is best to choose 100% cotton fabrics.  Higher quality quilting cottons are the best, but you can find decent fabrics at places like Joann's or Hancocks, just make sure to watch the quality.  You want to look for fabrics that have a slightly tighter weave and have a little more body to them.  If the fabric is extra limp, thin, or the grain is crooked it will be harder to work with.  These are things to be aware of when selecting fabrics as they will make your quilting experience MUCH more pleasant.  It is a great idea to sign up for sale flyers from Joann's or Hancocks or to get the Joann's app for your smart phone.  They run pretty great coupons much of the time.

As for batting, stick with cotton, wool or bamboo.  My favorite batting is Warm and White.  Run... fast... in the other direction from the cheap polyester batting.  Fusible batting is nice for smaller projects such as place mats, wall hangings and baby quilts.

2. Quilt patterns are kind of overrated.

I use graph paper and colored pencils to design most of my quilts.  Use graph paper that has 6 squares to the inch and just give each square a preset size such as 1 or 2 inches.  This is a great website for custom graph paper.   You can certainly use a pattern if you like, but most of them are simple combinations of squares, rectangles and triangles.

3.  Make sure to include your seam allowance.

Most quilting uses a 1/4 inch seam.  That means 1/2 inch will need to be added to whatever you want your finished size to be.  For instance, if you want a square to finish at 4 inches, it must be cut at 4 1/2 inches to accommodate for your seam allowance.  Measure twice... cut once.

4. Use a quarter inch foot.

Trust me on this one.  Your seams will be more accurate and if you are participating in a block swap or something of that nature, your blocks will be the right size when finished.  Just line the fabric up with the right hand side of the foot as it goes through.  Accuracy is a must when quilting.

5.  Use a rotary cutter.

A good rotary cutter, a large mat and a clear quilting ruler that is at least 24 inches are essential tools for the quilter.  Make sure to keep a sharp blade in the cutter and be VERY careful of your fingers.  I know someone who nearly cut off the tip of her finger, enough said... rotary cutters are tools to be respected.  Learn how to use them correctly here.

6.  Take the time to be accurate with your cutting.

Taking the time to square up, measure and cut carefully will make assembling your quilt top worlds easier than if the pieces are not cut correctly.  I always allow a little extra fabric when buying just to allow for mistakes.  Check your strips often if you are cutting several from the same piece of fabric.  Open your strip at the fold.  If you see it beginning to look like a "v", you will need to square up again and re-cut your strips.

7. Use your needle down setting.

I use this all of the time no matter what I am sewing.  It's like having a third hand and it keeps your fabric from slipping around if you should need to lift your presser foot.

8.  Learn how to chain piece, strip piece, and nest your seams.

Chain piecing and strip piecing will help your quilt top go together faster.  Particularly if you are sewing a lot of small pieces or are doing 4 patch blocks or nine patch blocks.
There is a tutorial here for chain piecing which also includes how to "nest" or "lock" the seams together, and one here for strip piecing which also shows the nesting of the seams.

"nesting" or "locking" the seams simply comes from pressing opposing seams in opposite directions.  When you line them up they will tend to just fit right together. This helps to make your corners match up perfectly.

9. Learn how to pin baste.

I like to use the bent quilter's safety pins.  I think they are much easier to use than the straight ones.
There is a great tutorial here.  

10.  To tie or to quilt?

The batting in the middle of your quilt can be secured using a couple of different methods.

You can tie it.  In this case you would use yarn or pearle cotton and simply stitch through the quilt by hand every few inches, leave the tails long and then tie them in a square knot. Tutorial here.

You could also quilt it by hand.

You could straight line machine quilt it.  For this you will need a walking foot.  The walking foot moves both the top and bottom layers of your quilt together and will help you have a smoother line of stitching without getting the layers bunched up.

If you are really daring you can free motion quilt it.  For this you will drop your feed dogs or put your darning plate over them and move the fabric by hand.  You will also need a free motion or darning foot for this.  It takes a little practice to get the hang of it, but the possibilities are endless once you become proficient.  I would suggest doing some practicing on scrap fabric and batting first or possibly a small project such as a potholder, bib or place mat.  I also find machingers gloves to be very helpful.  I do not free motion quilt without them.

11. Trim and square your quilt before you bind it.

Simply use your rotary cutter and mat and get the edges and corners as straight and as square as possible before binding it.  It will not be perfect, your quilt will kind of squish and stretch as you quilt it.  Just do the best you can.  The eye can be fooled a little as long as it isn't too horribly out of square.

12. Sewing on the binding.

I prefer to attach my binding by machine and then secure it in the back using a hand hem stitch.  There are those who prefer to do all of it on the sewing machine.  It is truly your preference.  I just personally like the look of hand sewn binding.  I usually cut mine at 2 1/2 inches, join the strips at a 45 degree angle so that they make all one long strip.  After that I press it in half the long way so that it folds to be a 1 1/4 strip of double thickness.  Line up the raw edges of the binding strips and the raw edge of the quilt and sew them down.  I actually cheat a little here and I use my regular machine foot which is slightly wider than 1/4 inch to the edge of the foot.  I have had one too many quilts come apart at the binding after washing using only a quarter inch allowance.  I have written a tutorial to show how to join the ends together.  Then just simply wrap the binding over the raw edge of the quilt and stitch it down in the back.  I use hair clips to hold the binding in place as I stitch.  It works great, I don't have to worry about my cat trying to eat the pins (for real!) and I also don't wind up poking myself with pins as I shift the quilt around while I am sewing the binding down.

It is also helpful to learn how to miter your corners.  It makes for a nice look to the finished quilt.
Follow on Bloglovin
